How to register to vote by mail in Canada
The Elections Canada web site is very confusing. If you wish to register to vote by mail in Canada, download one of two “Application for Registration and Special Ballot” forms:
What to do when you get a new credit card
As soon as you get that shiny new credit card, do the following:
- Activate the card. Call the 800 number on the sticker and answer the IVR prompts or convince the human that you’re real.
- Sign the card.
- If you haven’t already, call customer service and opt out of everything: phone, mail and email solicitations; list sharing; affiliate sharing. Be sure to opt out of “SuperChecks” or balance transfer checks. You’ll probably still get one or two of these. Ugh. Ask if there’s anything else you can be opted out of.
- Sign up for electronic billing.
- Set up email and text alerts to remind you when your bill is due; when you’ve hit a certain spending threshold; etc.
- Add the new credit card to your personal finance software (mint.com, Quicken, etc.) Enter the username and password you used in step (4), when you set up your account on the card’s web site.
- Set up online bill payment. Do one of both of these, as your card allows:
- Log in to your bank’s web site, and add the credit card as a bill/payee.
- On your credit card’s web site, add your bank account. Then, come bank in 2-3 days and confirm the deposit amounts to prove ownership of the account.
Once you’ve done this, make a small test payment — say, $10. That way, you can be sure payments will work properly in a month, when it’s time to pay your bill. You don’t want to find out something went wrong 24 hours before payment is due.
HOWTO count words in JavaScript
Here is a handy JavaScript function for counting words:
String.prototype.countWords = function(value) { // remove html tags var cleanedText = this.replace(/< .[^<>]*?>/g, ' ') // remove numbers and punctuation .replace(/[–—.(),;:!?%#$‘’“”'"_+=\/\-]*/g, '') // remove/coalesce space chars .replace(/( | |[ ])+/gi, ' '); // don't split "" into words, as you'll get 1 ([""]) if (cleanedText === "") { return 0; } // count words return cleanedText.split(/\W/).length; }
HOWTO set up IMAP email for Yahoo
A few weeks ago, I was helping my cousins set up their new iMac. Once everything was up and running, she inquired about adding their Yahoo account to Mail. The conventional wisdom says you can’t do this. Yahoo charges for POP access. IMAP? Unavailable.
But then she hands me her new iPod touch…with her Yahoo mail account working just fine. It must get the mail somehow. And it’s highly unlikely Apple wrote some sort of custom HTTP-Mail transport just for them.
You can have IMAP access to your Yahoo Mail account. For free. Here’s how.
Cutting to the chase
IMAP server: apple.imap.mail.yahoo.com (username = Yahoo ID)
SMTP server: apple.smtp.mail.yahoo.com (username = [email protected])
SSL enabled. Authentication = password.
Step-by-step guide to configuring Mac OS X Mail for Yahoo
- Go to Mail > Preferences…
- Click Accounts (toolbar)
- Click + (lower left)
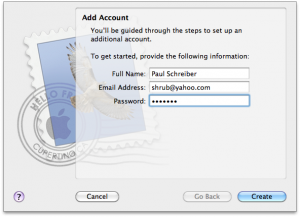
- You’ll see the first pane of the wizard. Enter your email address and password. Then click Continue.
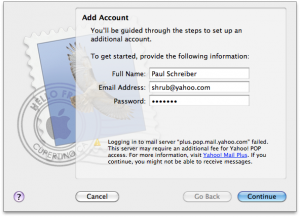
- Mail recognizes this as a Yahoo account. But you’re not a paying Yahoo Mail Plus customer, and don’t have access to the POP server. Don’t worry. That’s okay. Click Continue anyway.
- On the next screen, select IMAP from the popup and enter apple.imap.mail.yahoo.com as the server name.
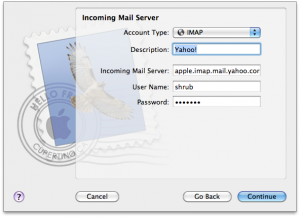
Note: most of the instructions on the internet tell you to enter imap.apple.mail.yahoo.com. While this also works, you’ll get an SSL error:
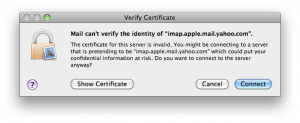
since Yahoo’s wildcard certificate is for
*.imap.mail.yahoo.com. If you do this, you have to click Show Certificate, check the “Always trust…” checkbox, click connect and enter your Mac OS username and password.Why bother?
- Next, enter apple.smtp.mail.yahoo.com as your SMTP server. Enter your username (full yahoo email address) and password and click Continue:
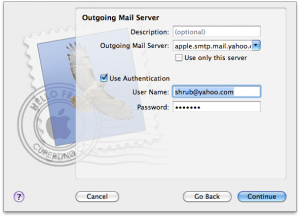
- The good news: Mail has recognized this as not just an IMAP account, but a Yahoo IMAP account.
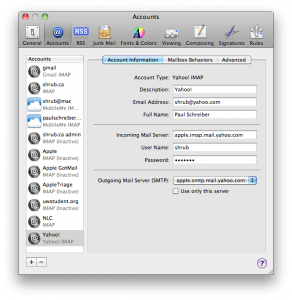
The bad news: it thinks it’s a POP account, and has set the port to 995.
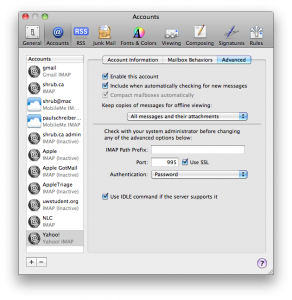
Change the port to 993.
- Finally, we need to set up the Junk mail folder. Click the Mailbox Behaviors tab. Besides Junk, check “Store Junk messages on the server.”
Then, close the preferences window. When prompted, click Save.
- Now, put your feet up. Depending on the amount of email you have, it could take an hour or more to download it all. Yeah, you whose friends email them photos instead of posting them to Flickr. That’s right. You.
Once that’s done, you need to identify four mailboxes as special: Draft(s), Trash, Sent and Bulk Mail (Junk).
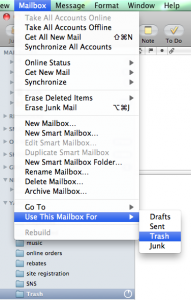
Select the Draft folder. Then select Mailbox > Use This Mailbox For > Drafts:
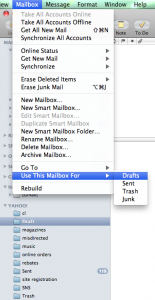
Select the Trash folder. Then select Mailbox > Use This Mailbox For > Trash:
Repeat for Sent and Bulk Mail.
Only if I have an equation editor
I’m supposed to sign up for your site how?

NPR Valentines
HOWTO setup multistage deployment with Capistrano
When I wrote about deploying PHP sites with Capistrano, step 6 was a bit of a throwaway — hey, here's a quick hack for handling multistage deployment. I'd been using variants of that technique for quite some time but figured there must be a better way. There is: Capistrano multistage. There is even documentation for this. But it misses a few steps.
How to setup multistage deployment with Capistrano
- Install capistrano and capistrano multistage
- Capify your project
- Set up the
deploy/directory - Create the deployment recipes
In my Rails-based example, we'll have two stages: staging and production. You can name your stages whatever you want. However, don’t name one of your stages stage — that's a reserved word. Call it staging.
Install capistrano and capistrano multistage
gem install capistrano

gem install capistrano-ext
Capify your project
capify .
Set up the deploy directory
mkdir config/deploy

touch config/deploy/staging.rb

touch config/deploy/production.rb
Create the deployment recipes
You’re going to edit three files: deploy.rb, staging.rb and production.rb:
deploy.rb
set :stages, %w(staging production) set :default_stage, "production" require 'capistrano/ext/multistage'
default_run_options[:pty] = true
set :application, "myproject" set :use_sudo, false set :keep_releases, 5
set :repository, "https://somewhere/svn/myproject/trunk" set :scm, :subversion set :scm_username, "me" set :deploy_via, :export
# this is useful in a shared hosting environment, where you have your own JAVA_HOME or GEM_HOME. # otherwise, just set RAILS_ENV set(:rake) { "JAVA_HOME=#{java_home} GEM_HOME=#{gem_home} RAILS_ENV=#{rails_env} /usr/bin/env rake" }
# since :domain is defined in another file (staging.rb and production.rb), # we need to delay its assignment until they're loaded set(:domain) { "#{domain}" } role(:web) { domain } role(:app) { domain } role(:db, :primary => true) { domain }
namespace :deploy do task :start do ; end task :stop do ; end task :restart, :roles => :app, :except => { :no_release => true } do run "#{try_sudo} touch #{File.join(current_path,'tmp','restart.txt')}" end end
# for some reason, this isn't enabled by default after "deploy:update", "deploy:cleanup"
# here is an example task which uses rake, as defined above after "deploy:migrate", "load_sample_fixtures" desc "load sample fixtures" task :load_sample_fixtures do run "cd #{current_release}; FIXTURES=samples #{rake} db:fixtures:load" end
staging.rb
set :deploy_to, "/path/to/#{application}-stage" # My Rails app uses RJB, so it needs to know where Java lives set :java_home, "/path/to/java-6-openjdk" set :domain, "testing.myserver.ca" set :user, "paul" set :rails_env, "staging" # I am root on my staging server and have all the right gems installed # so I don't need GEM_HOME to be overridden set :gem_home, nil
production.rb
set :deploy_to, "/home/myuser/#{application}" set :java_home, "/home/myuser/sw/jdk" set :domain, "www.myserver.ca" set :user, "myuser" set :rails_env, "production" set :gem_home, "/home/myuser/ruby/gems/"
# in a shared hosting environment, you often need to specify your own passenger configuration desc "copy the .htaccess file (passenger configuration); setup_load_paths.rb (sets GEM_HOME)" namespace :deploy do task :copy_htaccess do run "cp #{current_release}/config/htaccess_production #{current_release}/public/.htaccess" run "mv #{current_release}/config/production_setup_load_paths.rb #{current_release}/config/setup_load_paths.rb" end end
after "deploy:update_code", "deploy:copy_htaccess"
Now, you’re set. You can deploy with cap deploy (for the default stage, production), or cap staging deploy. TextMate's Capistrano plugin handles this gracefully, presenting you with a dialog listing the available stages.
How to display tweets on a WordPress page
There are a lot of ways to display your tweets on your blog. Many are complicated and ugly. Sometimes, you hit Twitter’s API rate limit. Most require the client to perform additional work. I made a very simple WordPress plugin to handle this.
All you do is stick [get_latest_tweets username="me"] where you want the tweets to go. You can optionally supply a count=X parameter to display more or fewer tweets.
JSON is cached, preventing the Twitter server from being hit more than twice in one minute.
You get markup like this, which you can style as you please:
<ul class='tweets'>

<li>@<a class='atreply' href='http://twitter.com/jane'>jane</a> Please dance a jig. <span class='date'><a href='http://twitter.com/me/status/2345'>3 hours ago</a></span></li>

<li>Anyone used TotalFinder? <a href='http://t.co/blah'>http://t.co/blah</a> Saw it on @<a class='atreply' href='http://twitter.com/bob'>bob</a>'s machine and am intrigued. <span class='date'><a href='http://twitter.com/me/status/1234'>6 hours ago</a></span></li>

</ul>
Grab the plugin from GitHub or the WordPress plugin directory.
Fixing iChat Google Talk login failures
I was helping a friend set up her new iBook MacBook yesterday, and we were unable to get iChat to log in to her Google Talk account.
We kept seeing this error:
iChat can’t log in to talk.google.com because your login ID or password is incorrect.
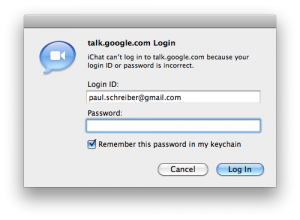
And this XMPP error was logged to Console:
iChatAgent[33567] [Warning] JConnection: Error: Error Domain=XMPPErrorDomain Code=10 “The operation couldn’t be completed. (XMPPErrorDomain error 10.)”
When we tried the same username and password on gmail.com in Safari, it worked. It also worked logging in to Google Talk using Adium.
So what’s going on? Well, my Google Account is [email protected]. Most people know Google also accepts emails sent to [email protected]. What I didn’t know is that you can also use paul.schreiber as a username. Most of the time.
Let me explain with a chart:
| username | gmail.com | iChat | Adium |
|---|---|---|---|
| paulschreiber | YES | YES | YES |
| paul.schreiber | YES | NO | YES |
The problem was the dot. Once we removed it, we could log in successfully.
I assume the same thing happens if your actual username has a dot and you remove it.
Filed with Apple as Radar 8978731.
